LAT Workbook Dreamweaver Tips: Part 1
| Web Projects | LAT Newsletter "How to:" | LAT WB DW Tips: Part 1 | LAT WB DW Tips: Part2 |
Dreamweaver, Fireworks, and Frames:
One of the major reasons for selecting Dreamweaver and Fireworks is that, as a graphics program, Fireworks is pretty straight forward and, most importantly, it has a seamless interface with Dreamweaver. This is particularly useful when using frames and navigation bars to create a flexible navigation hierarchy that does not scroll off of the page.
Tips:
- All navigation bars are created and updated using Fireworks and saved in a Dreamweaver 'Files' folder. (It's best to save them in the same folder that you save the 'Frames', e.g., 'banner', 'topFrame1', 'topFrame2', and 'mainFrame'.)
- Create any "hot spots"/links that you want to embed in the graphic. (It's also a good idea to underline and use a blue font for the link text, and then place the "hot spot" over that text, thus giving your user a standard means of identifying that a link is present.
- After creating/updating and saving a navigation bar in PNG format, export it to the same folder in which it is saved. (Two additional files will be created: an HTML file, and a graphic file.) Be sure to save the PNG file again to lock in the export path.
- Top-level navbars only. In a frameset, the top-level navbar (e.g., the one appearing in the 'banner' frame), must be inserted into the Dreamweaver 'Frames' document (e.g., banner). This is done by selecting:
Insert-->Image Objects-->Fireworks HTML
Note: Launch a 2nd-level navbar, link the 2nd-level navbar's HTML file from a button on the top-level navbar and target topFrame2.
Similarly, a 3rd-level navbar's HTML file is launched from a 2nd-level navbar's button and targets topFrame2.
- When you are embedding a link on a navbar button, open the "index.html" frameset in Dreamweaver's main window, highlight any word in the mainFrame, then use DW's "point-and-shoot" function to create a link to your target. Then cut that link and paste it on the the "hotspot". (Saves time in the long run, if you have strayed from a flat-file structure.
- To locate a file's location (i.e., the path to the file in DW's file structure) when viewing a page in a browser, simply right click on the link to that page (i.e., the 'launch-text' source for the link) and 'Copy Link Location', or 'Open the Link in a new Tab or New Window'.
From here you can choose which site you want to work with, i.e., isoc_web, lat_newsletter, latOPS_isoc, or workbook. (You can ignore how_to_fix, sca_workbook, and zotts.) You can also choose to manage a site.
To view the frames diagram shown below, first click on a "splash" page so that it is visible in Dreamweaver's main window, then click on the Frames button shown at right. |
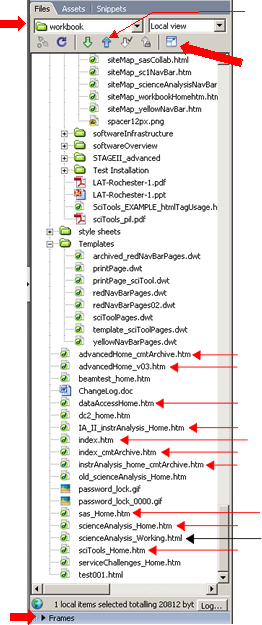 |
Select files you wish to upload to "go live", i.e., upload to the remote server, then click on the blue arrow shown at left. Click to view files on the remote server as well as on the local machine.
Notes:
|
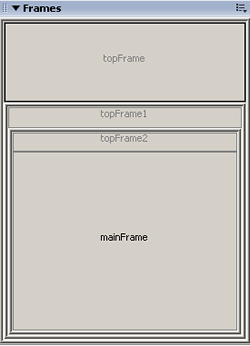 |
To link a frame to it's corresponding page,first click on the appropriate frame in the diagram shown at left, then use DW's "point and shoot" function:
to create the link (or you can type |
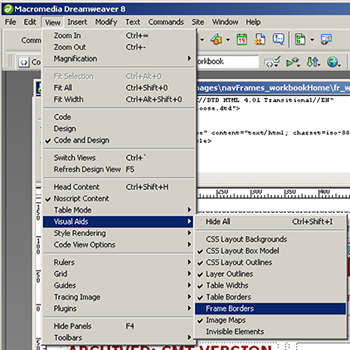
Viewing Frame Borders: When working with a "splash" page that
is using frames and is displayed in DW's
main window, you can view the frame
borders by selecting Note, however, that generally speaking you should not resize
an existing "splash" pages frames. If you
do, be sure to "Save All" and then check
how the page is displayed in different Normally, if pages display okay in Internet Explorer and in Firefox, they will display okay in other browsers as well. |
 |
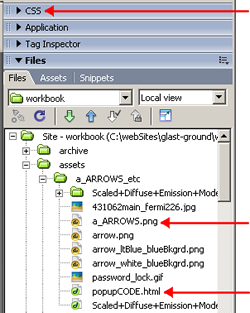 |
You can link cascading style sheets from here.
Useful resource when working in Fireworks. (PNG files automatically open in Fireworks, so all you have to do is click on it.)
This is the popup code I normally use when embedding a popup link. After replacing the xxxx's and yyyy's with the link path, set the width and length to fit the popup page. |
Last updated by: Chuck Patterson 06/10/2011 |