Desktop Installation (Developers): Windows
TortoiseCVS
TortoiseCVS is now recommended as the preferred method for using CVS on Windows, replacing WinCVS. TortoiseCVS has several advantages in that it:
- Integrates directly into windows explorer.
- Provides more functionality.
- Does not rerquire that you use an insecure ssh key with no pass phrase.
Prerequisites
This procedure assumes that you have already installed:
- Kerberos
- PuTTY
If you have not, please refer to Secure Shell (SSH) for Windows, and install them now.
Install TortoiseCVS
- Download and install a free copy of TortoiseCVS.
- To setup the TortoiseCVS Preferences, go to Start --> Programs --> TortoiseCVS --> Preferences and make sure the settings are as shown below.
Notes:
- This step assumes that the C:\Program Files\Putty-GSSAPI\plink.exe is the correct path for your installation; if it is not, be sure to adjust it accordingly.
- Don't forget to add the -g under SSH parameters, which tells it to use Kerberos for login.

-
If you already have some code checked out from CVS, open that folder (in which the code is stored) in explorer and observe that TortoiseCVS has added:
- New icons to all the files to show their status.
- New items to the popup context menus for all files and folders.
All normal CVS commands can now be performed directly from windows explorer.
- If you want to checkout a new module from CVS:
- Navigate to a folder on your local drive that you want the code placed in, and open it.
- Right click, or from the explorer's File menu, select CVS checkout.
- Using the values below as a guide, fill in the form, then click OK to check-out the new module.

- Be sure that you are logged in to the Kerberos Network ID Manager for the day, then use TortoiseCVS to perform a CVS operation.
You should not have to give your password.
If it doesn't work, check the instructions carefully to see what you did wrong.
Part I. Concurrent Versioning System (CVS)
Prerequisites
|
Refer to Prerequisites: Basic and be sure that you have met all of the prerequisites that pertain to your site before proceeding. |
|
If you have not already done so, you must also install the GLAST-supported compiler on your machine and set up your user PATH. (See Platforms Supported.) Note: GLAST does not provide this software. |
Troubleshooting Tip: If installing a Windows compiler, be sure to set up your PATH to the executable devenv.exe, normally located in:
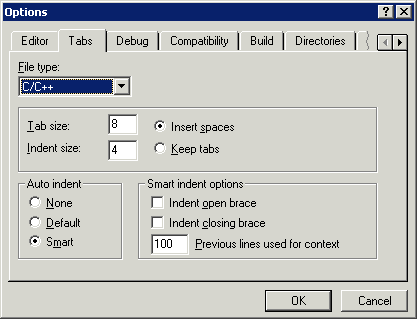
If using Visual C++, open the Tools --> Options menu and set your tabs so that spaces are inserted rather than tabs: |
|
Directory Structure
It is often helpful to create a special directory for GLAST work. This new directory, named
"glast" in this example, can then be used to contain subdirectories such as:
Subdirectory |
Contains |
|
Source code packages downloaded via CVS from the GLASTOffline CVS repository. |
|
Tools such as CMT, MRvcmt, WinCVS, Doxygen, etc. |
|
External libraries such as ROOT, Gaudi, etc. |
Downloads Required
To download and install WinCvs:
- Go to www.wincvs.org.
- On the main page, click on: Download
- Click on: WinCVS
- Select the Download Installer for the Latest Recommended Release.
Notes:
- Be sure to download the full installer, not the "Bare" installer.
- When prompted, select the CVSNT install.
- After installing CVS in your glast\tools directory, set up your environment variables to include CVS in the user path.
Note: Adding CVS to your PATH environment variable: If you are not familiar with setting up the environment variables for your machine, you may want to refer to Set Environment Variables (Developers): Windows Desktop Installation before performing the following steps.
- Create a new environment variable called CVSROOT and set it equal to:
:ext:centaurusa.slac.stanford.edu:/nfs/slac/g/glast/ground/cvs
Troubleshooting Tip : If your account name on your local machine differs from your SLAC account name, you need to prepend your account name to the noric node name, as in:
:ext:youraccountname@centaurusa.slac.stanford.edu:/nfs/slac/g/glast/ground/cvs
- Create another environment variable named CVS_RSH and set it equal to:
ssh
- Update the PATH to include the CVS executable
(e.g., C:\glast\tools\WinCVS 1.3\CVSNT).
Note: In the example given, there is a space between WinCVS and 1.3).
Test your CVS Installation:
- Open up a DOS window.
- At the command prompt, enter: cvs -v
You should see something similar to: Concurrent Versions System (CVSNT) 2.0.51d (client/server)
Test your CVS installation and connection to the GLAST Offline CVS Repository:
- At the DOS command prompt, enter your glast\packages directory
(e.g., cd C:\glast\packages).
- Then enter: cvs co templates
If successful, a directory named 'templates' will be created and a number of files will be retrieved from GLAST's Offline CVS Repository; otherwise, you will receive an error message.
- Erase the templates directory from your C:\glast\packages directory.
Useful CVS References:
Part II. Install the Configuration Management Tool (CMT)
Obtain CMT using the Glast Software Installer:
Install CMT using the Glast Software Installer:
Click on Launch Installer Now!
Follow the GUI instructions and install CMT.
Note: It is recommended that you install CMT in your C:\glast\tools directory.
If necessary, refer to: Glast Software Installer
Add CMT to your PATH environment variable:
Update your PATH to include the directory containing the CMT application (cmt.exe), e.g., C:\glast\tools\CMT\v1r16p20040701\VisualC.
Refer as necessary to: Set Environment Variables (Developers): Windows Desktop Installation.
Test your CMT Installation:
Open a DOS window.
At the command prompt, enter: cmt
Verify that a list of possible cmt command options is displayed.
Part III. Install GLAST Software and External Libraries
Decide which checkout package you wish to install GlastRelease, EngineeringModel, or ScienceTools - and the version of the package.
If necessary, refer to the Release Manager to determine the release status of a version. (The tag for all Windows versions of GLAST software is VC8debug.)
Create the directories where you want the software to be installed.
Note: It is recommended that you install the software release in your work directory (e.g., c:\glast\yourWorkDirectory) and the External Libraries in your C:\glast\extlib directory.
Click on Launch Installer Now! and follow the instructions on the GUI for installing both the release and the external libraries for the release.
If necessary, refer to: Glast Software Installer
WinSCP
You can download and install the free, open source, WinSCP [4.0.5 (or higher)] FTP/SFTP client, from the WinSCP website.
- To set up an SFTP session, launch WinSCP.
The following GUI will be displayed (defaults to the Session Pane):
Note: On the SSH pane, verify that SSH2 has been selected.
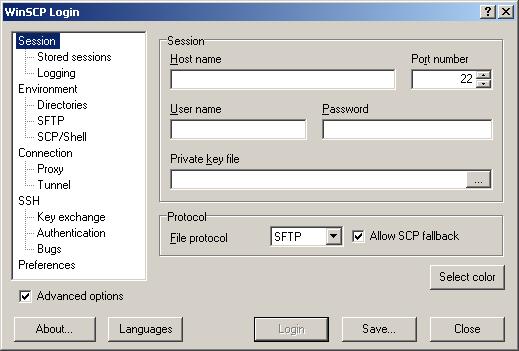
- Enter Host name, User name, and Password.
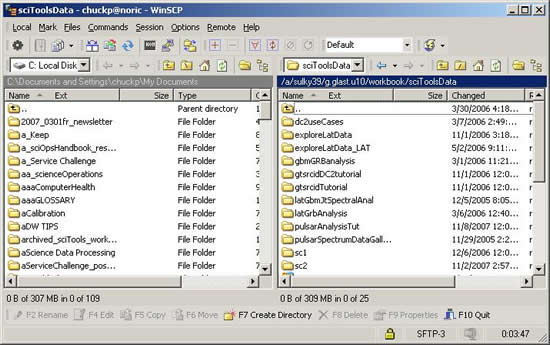
The following GUI will be displayed:
Note: The split-screen GUI is divided into a local and remote view with navigation provided for each. Files and/or folders can be copied in either direction using the "drag and drop" technique.
OpenAFS
Related Topics
FRED Overview and Installation
Note: FRED is an event viewer and is included with the installation of the External Libraries.
| Last updated by: Chuck Patterson 11/27/2007 |