GoGui: Initial Setup — SLAC Central Linux
On this page: |
This section covers the initial GoGui setup and package checkout on SLAC Central Linux for Workspace Scenarios 1-3. Information is presented in Scenario 1 that is not repeated in each of the other scenarios, including Desktop Scenarios 4-5. It is therefore strongly recommended that you perform the initial setup and checkout procedures for Scenario 1 before performing any of the others, in order to familiarize yourself with GoGui. (Setup and checkout procedures for Scenarios 2-5 all assume that you are familiar with Scenario 1.)
Note: GoGui and SCons installations are maintained and readily available on SLAC Central Linux by issuing the commands:
- GoGui
- Scons
Troubleshooting Tip: If you are accessing SLAC Central Linux from a Windows machine, you must have your X-server (e.g., X-Win32) running in the background, or neither GoGui nor the GLAST Software Installer will be displayed on your desktop.
Implementing Workspace Scenario 1
Assumptions
It is assumed that you have:
- Performed all of the prerequisites for your operating system: Linux or Windows.
- Familiarized yourself with GoGui: Workspace Scenarios.
Environment Variables
When running on SLAC Central Linux, three environment variables are required (two for access to CVS and one for access to the external libraries, i.e., GLAST_EXT).
For CVS, the CVSROOT and CVS_RSH must be set to the values shown shown below:
| CVSROOT | = | /nfs/slac/g/glast/ground/cvs |
| CVS_RSH | = | ssh |
Note: For SLAC authentication requirements, see: |
For GLAST_EXT, the value of the environment variable (e.g., redhat5-i686-32bit-gcc41) must match that which was used when the an executable was made in order for the wrapper scripts to work correctly. (These wrapper scripts allow you to run executables generated by SCons from the command line.)
| For GLAST_EXT on SLAC Central Linux, the correct values are: | ||
rhel4-32bit: |
/afs/slac/g/glast/ground/GLAST_EXT/redhat4-i686-32bit-gcc34 | |
rhel4-64bit: |
/afs/slac/g/glast/ground/GLAST_EXT/redhat4-x86_64-64bit-gcc34 | |
rhel5-32bit: |
/afs/slac/g/glast/ground/GLAST_EXT/redhat5-i686-32bit-gcc41 | |
rhel5-64bit: |
/afs/slac/g/glast/ground/GLAST_EXT/redhat5-x86_64-64bit-gcc41 | |
For the purposes of this exercise, we will be accessing the base release for an SCons build for ScienceTools-09-17-00 for a rhel4-32 bit machine located in the appropriate ReleaseManagerBuild directory on u35. It is further assumed that you are operating in a C Shell, and that you will be checking out burstFit[02-02-04].
Tip: When you login to a SLAC Central Linux machine, the header will tell you tell you what type of machine you are on; for example:
If you don't want to be on a RHEL4-32bit machine, you can ssh to another type; for example:
SSH RHEL5-64
In this case, the following header was displayed:
Make a note of the specific machine (e.g., noric05), and then create a session on your telnet client (e.g., PuTTy) that you can use the next time you login.
For more information about SLAC's load-balanced server pools see Public Machines at SLAC.
Procedure
- Login to your SLAC account and, from the prompt, issue the command: pwd
Note that the response is similar to:
- Create a work directory (e.g., GoGui_test) and the following subdirectories:
/afs/slac.stanford.edu/u/gl/userName/
applications extlib packages
- Issue the command: env|sort and check that the CVSROOT and CVS_RSH environment variables are correct. (See Environment Variables.)
- Check that the BUILDS variable points to /nfs/farm/g/glast/u35/builds; if it does not, change it now:
setenv BUILDS /nfs/farm/g/glast/u35/builds
Note: If you are in a Bash shell, enter: BUILDS=/nfs/farm/g/glast/u35/builds
- Refer to Environment Variables and set the GLAST_EXT variable to point at the correct value; in this case, you would enter:
/afs/slac/g/glast/ground/GLAST_EXT/redhat4-i686-32bit-gcc34
Tips:
- Use RMViewer to learn more about the available builds.
- It is strongly recommended that you routinely set GLAST_EXT when you login to SLAC Central Linux!
- From the prompt, enter: GoGui
Note: If you are accessing SLAC Central Linux from a Windows machine, make sure that you X-server (e.g., X-Win32) is running.
The following gui will be displayed on your desktop:
![]()
- Access a Working Version of SCons. To access SCons on SLAC Central Linux, click on the dropdown Options menu shown above, and select:
Options --> utility options..
Then fill in the values as shown below on the Cvs, Scons Config gui:
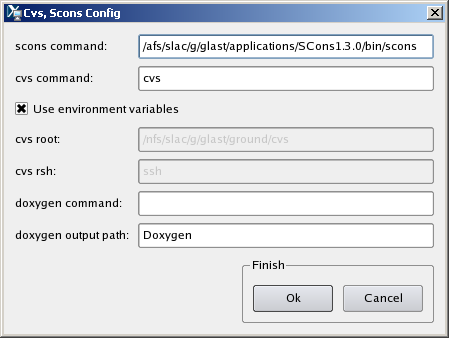 |
Notes:
- CVSROOT and CVS_RSH. If you haven't defined environment variables for CVSROOT and CVS_RSH you can unclick the check box and type in the values shown.
Tip: Before bringing up GoGui, you can arrange your path or set an alias for scons so that it resolves to the value above and set the environment variables cvs needs. Then you won't have to bring up this dialog at all.
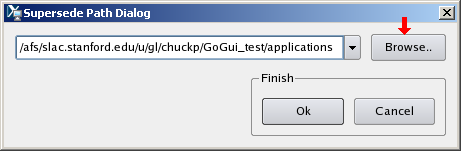
- Set the Supersede Path. From the GoGui Options menu, select Set supersede path... and set it to point to your applications subdirectory:
Caution: Do not attempt to use the Browse.. button to set this, or any other path, starting with afs unless it's reachable from your home directory without having to go up to /. It can take a very long time – or even hang the application – and you will have to kill it. However, it is okay to type in such a path.
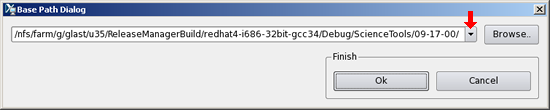
- Set the Base Path. From the Options menu, use the Set base path... option to point to the appropriate builds directory; for example, the ReleaseManager builds for RHEL4 32 bit-gcc34 are at:
/nfs/farm/g/glast/u35/ReleaseManagerBuild/redhat4-i686-32bit-gcc34/
... and we know that we want to checkout a package from the Debug version of ScienceTools; hence the full path to the base directory we are interested in is:
Note: GoGui will remember all base paths you use, so that you can readily go back and forth between different development projects. This information, like that in all of the options dialogs, is preserved from session to session.
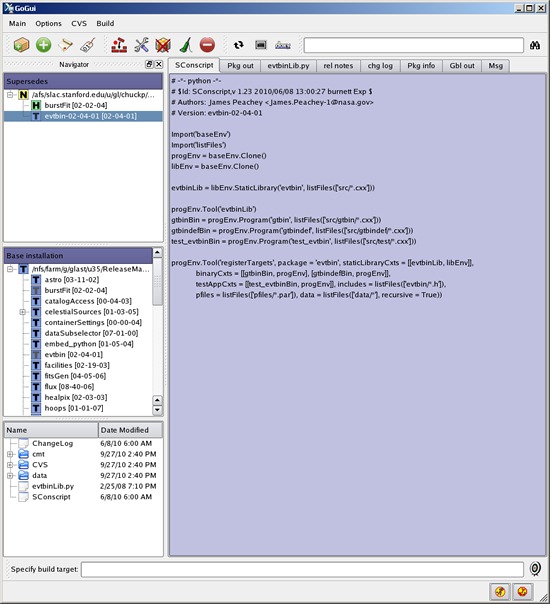
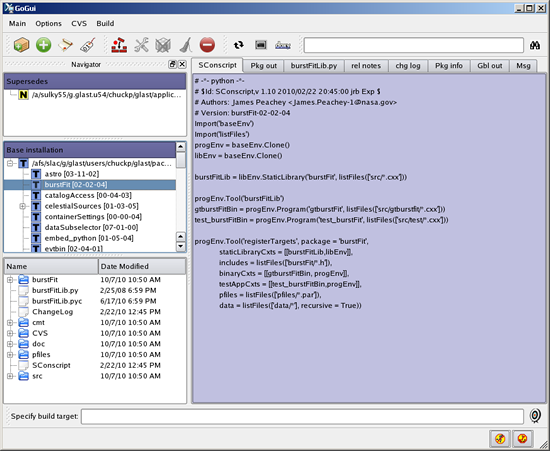
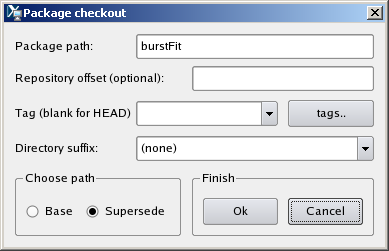
- Allow a few minutes for GoGui to populate its navigation panes, then scroll through the packages (in this case for the latest released build 09-17-00), then click on the burstFit package; note that its version number is 02-02-04.
- Checkout the burstFit package. From the CVS menu, select the cvs checkout.
 |
| Note: Click on the tags button to populate the pulldown menu with the available tags. |
- Click on the tags button to populate the pulldown menu with the available tags; select burstFit-02-02-04; select Directory suffix (use tag), select the Supersede path, then click Ok.
A copy of the burstFit[02-02-04] package now resides in your applications directory, and is also listed in the Supersedes Navigator pane.
Post Checkout
Notes:

- In the Base installation pane, observe that burstFit T is faded (e.g., T), indicating that it has been superseded, and you can no longer build packages in the base installation. Once there is a supersede directory, SCons treats the base installation like an external library.
- The Combo box. GoGui will remember all base paths you use in the combo box so that you can readily go back and forth between different development projects. This information (and everything else entered in options dialogs) will be preserved from session to session.
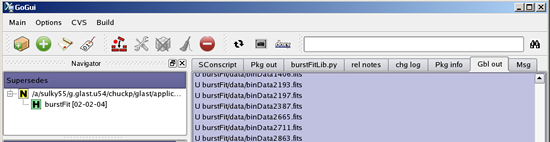
- In the Navigator Supersedes pane, click on burstFit[02-02-04]:
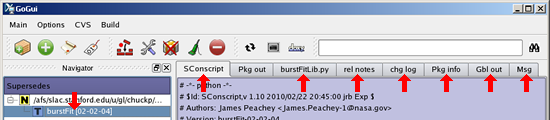
Then, in turn, click on the following tabs:
SConscript | burstFitLib.py | rel notes | chg log | Pkg info | Gbl out | Msg
Observe that no Pkg out has yet been created.
- Checkout another package. To checkout another package:
- In the Base installation pane, click on the package of interest
(e.g., evtbin [02-04-01]).
- Click on
 checkout new package
The Package checkout dialog will be displayed.
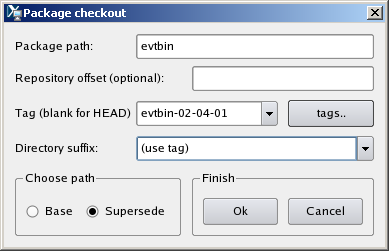
- Click on the tags button; select the tag evtbin-02-04-01; select the Directory suffix (use tag), select the Supersede path, then click Ok.
A copy of the evtbin [02-04-01] package now resides in your applications directory, and is also listed in the Supersedes Navigator pane.
Implementing Workspace Scenarios 2 or 3
Important! If, for some reason, you decide that you need to download and install a base release in your SLAC Central Linux work area, but want to either link to the external libraries (Workspace Scenario 2) or to install the external libraries (Workspace Scenario 3 ), you will need to request a significant increase in memory for your work area as the size of the base release will be quite large, especially if you are installing the Developer Release Type, which includes both the source code and the binaries. (See Individual User Work Space on SLAC Central Linux.)
Procedure
- First, review Implementing Scenario 1 then, using RMViewer determine the build that you want to work with (e.g., ScienceTools-09-17-00).
Make note of the operating system for that build (e.g., RHEL4-32, RHEL4-64,
RHEL5-32, RHEL5-64).
- Login to SLAC Central Linux, making sure you're on the correct type of machine (e.g. RHEL4-32), then cd to your individual user work space on SLAC Central Linux:
cd /afs/slac/g/glast/users/<username>
- Then create your work area (e.g., glast) and the following subdirectories:
applications | extlib | packages
- Issue the command: env|sort and check that the CVSROOT and CVS_RSH environment variables are correct. (See Environment Variables.)
- Check that the BUILDS variable points to /nfs/farm/g/glast/u35/builds/; if it does not, change it now:
setenv BUILDS /nfs/farm/g/glast/u35/builds/
Note: If you are in a Bash shell, enter: BUILDS=/nfs/farm/g/glast/u35/builds/
- Refer to Environment Variables and set the GLAST_EXT variable to point at the correct value; in our example, you would enter:
/afs/slac/g/glast/ground/GLAST_EXT/redhat4-i686-32bit-gcc34
Tip: It is strongly recommended that you routinely set GLAST_EXT when you login to SLAC Central Linux!
- Launch the Glast Software Installer by issuing the command:
- Select:
Selections Used in This Example: Package ScienceTools Release Release Version 09-17-00 Variant Debug OS redhat4-i686-32bit-gcc34 Release Type Source Note: If you want both the source code and the user binaries (for test purposes), select 'Developer' as the Release Type.
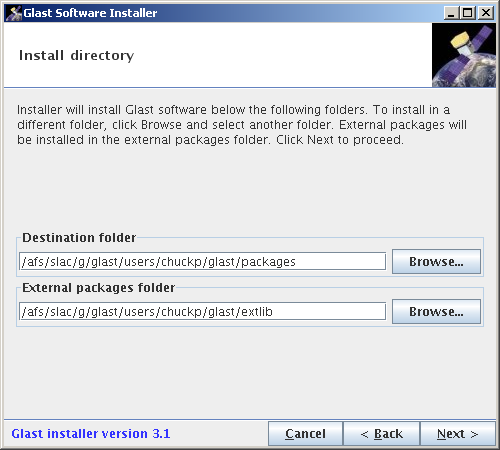
- Click the Next button and check that the path for "Destination folder" points to your packages subdirectory, and that the path for "External packages folder" points to your extlib directory.
Note: The installer requires that you have an extlib directory, or it will create one.
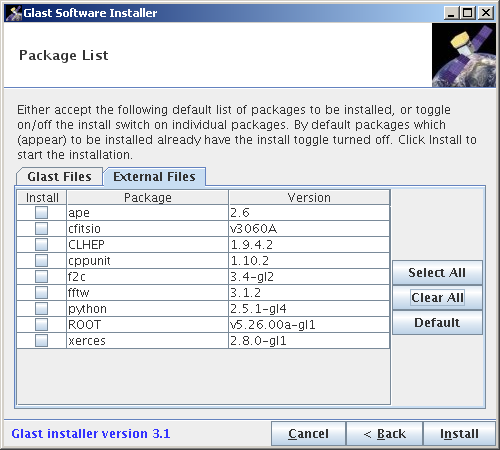
- Click the Next button and, under the Glast Files tab, make sure the ScienceTools package is selected.
Workspace Scenario 2 or 3? Then click on the External Files tab and the Clear All button to deselect the external packages (or the Select All button, if you are implementing Workspace Scenario 3 and wish to install the external libraries in your work area). If you are installing the external libraries in your work area, remember to set your GLAST_EXT environment variable so that it points to your /afs/slac/g/glast/users/<username>/glast/extlib folder.
Note: In future installs, if you choose to install the external libraries.,,,, the installer will check the contents of your extlib directory to determine which additional libraries you will need for the packages you are installing.
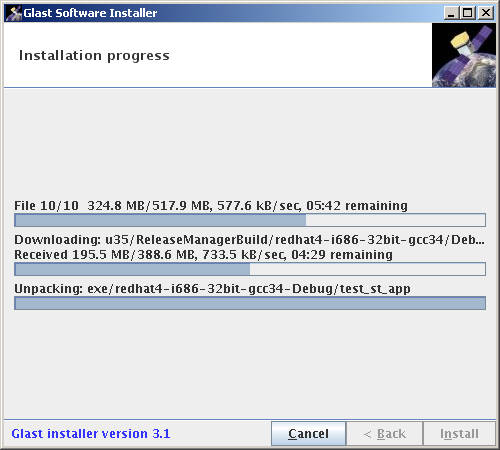
- Click on the Install button; the Installation progress window will be displayed:
- Once the install has completed, launch GoGui: GoGui
- Access a Working Version of SCons. To access SCons on SLAC Central Linux, click on the dropdown Options menu shown above, and select:
Options --> utility options..
Then fill in the values as shown below on the Cvs, Scons Config gui:
|
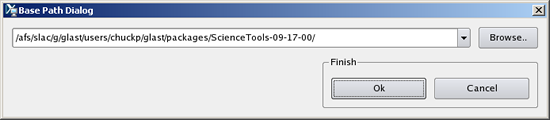
- Set the Base Path. From the GoGui Options menu, select Set base path... and set it to point to your /packages directory; for example:
/afs/slac/g/glast/users/chuckp/glast/packages/ScienceTools-09-17-00
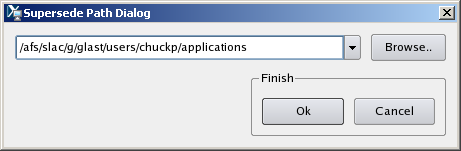
- Set the Supersede Path. From the GoGui Options menu, select Set supersede path... to point to your applications subdirectory; for example:
/afs/slac/g/glast/users/chuckp/applications
- Workspace Scenario 2 or 3?
- If you are implementing Scenario 2 (i.e., linking to the external libraries), your GLAST_EXT environment variable should be (for this example of a RHEL4-32 build):
/afs/slac/g/glast/ground/GLAST_EXT/redhat4-i686-32bit-gcc34
- If you are implementing Scenario 3 (i.e., downloading to the external libraries) set your GLAST_EXT variable to:
/afs/slac/g/glast/users/<userName>/glast/extlib
- In GoGui's Base installation pane, click on the package you are interested in (e.g., burstFit):
- From the CVS menu, select the cvs checkout option, and enter the information on the Package checkout GUI as shown below:
- Click on the Ok button.
A copy of the burstFit package now resides in your applications subdirectory, and is also listed in the supersedes navigator pane.
Post Checkout
Owned by: Joanne Bogart |
| Last updated by: Chuck Patterson 10/20/2010 |